Finishing Access Point Configuration
Finishing the AP configuration step involves finalizing the AP configuration settings that yield an operational wireless LAN. In this section, we configure the RG−1000 for standalone wireless LAN operation.
The wireless LAN resulting from this configuration allows computers in the wireless LAN to communicate with each other, as shown in Figure 1.

In a later tutorial, we explore the other operating modes of RG−1000 that you can use to connect a wireless LAN to the Internet. In this tutorial, we assume that you have installed and powered up the RG−1000 AP and successfully installed the ORiNOCO Silver PC Card wireless LAN adapter.
Follow the steps in the next section to successfully install RG−1000 Setup Utility software and configure the RG−1000 AP for standalone wireless LAN operation.
Install the ORiNOCO RG−1000 Setup Utility Software
ORiNOCO ships a compact disk (CD) with the RG−1000 AP that contains the RG Setup Utility. This is the software that you need to wirelessly configure the RG−1000. Following the steps will help you successfully install the RG Setup Utility.
- Insert the CD−ROM that came with your Residential Gateway kit into your computer. Your operating system will run the CD automatically.
- Click the install button RG Setup Utility.
- Select Install Software.
- Select Install Client Manager. Follow the instructions on your screen.
If the CD−ROM does not start automatically, do the following:
- Click the Windows Start button.
- Select Run.
- Browse to the CD−ROM.
- Double−click the file "start.exe".
Once the installation process is finished, you can execute the RG Setup Utility to set up the RG−1000 AP.
Start the RG Setup Utility
The RG Setup Utility allows you to view or modify the following network settings.
- Internet Access Settings. The Internet access settings enable you to use the RG−1000 gateway to share an Internet connection or to connect the wireless LAN to a wired LAN.
- Wireless Connection Settings. Wireless connection settings for radio channel, security, and TCP/IP parameters of the wireless LAN.
The following steps help you start the RG Setup Utility:
- Click the Start button on the Windows task bar.
- Select Programs, and then select ORiNOCO.
- Select RG Setup Utility to start the program.
- Once the RG Setup Utility starts executing, you see a Welcome screen similar to Figure 2.

Click the Continue button. You should see a screen similar to one shown in Figure 3. To connect to RG−1000, enter the six−character Network Name printed on the label on the device and click Continue.

If a screen Setup your Internet Connection, as shown in Figure 9.14 appears, you were successful in properly starting the RG Setup Utility. If you encounter difficulty accessing the Residential Gateway to view or modify its current settings:
- View and modify, if needed, the settings of the wireless adapter in your computer to ensure that the Network Name matches the value printed on the label at the back of the Residential Gateway.
- Make sure that the encryption key matches the value of the Residential Gateway (default key matches the last five digits of the Network Name).
- View and modify, if needed, the Networking properties on your computer to ensure the TCP/IP protocol is installed for your wireless adapter. Make sure that the TCP/IP protocol has DHCP enabled, to obtain an IP Address from the Residential Gateway automatically.

The Setup your Internet Connection screen lets you decide how you want to use your RG−1000. Since, in this example, we only want to set up a standalone wireless LAN, select [no Internet] option for Internet access via option. Figure 4 shows the selection of this option.
Modify Residential Gateway Wireless Connection Settings Change these settings to increase the security of your wireless network, set up special connection requirements, and improve your wireless communication. Figure 5 shows the wireless connection settings.

- Wireless channel. To transmit and receive data, the Residential Gateway uses a frequency channel. If neighboring wireless networks are using the same channel, it is advisable to have your Residential Gateway network use a different channel.
- Encryption key. Communication within your network is only possible by wireless computers using the same Encryption Key. This is what the Residential Gateway uses to enable Data Security on your wireless network.
The default value of the Encryption Key equals the last five characters of the Network Name. To prevent any access to your network without permission, it is strongly advised to change the default encryption key value.
Click on Finish to complete the AP setup process. If you do not get an error message when you click on Finish, you have successfully completed the RG−1000 setup process.
If you get an error message, make sure that you have correctly followed the configuration steps and consult the ORiNOCO RG−1000 user's manual for more information.
Once you have completed the RG−1000 setup process and successfully installed the ORiNOCO PC Card in your laptop, you have completed the steps required for your standalone wireless LAN.
The next step for you is to test the wireless LAN from the laptop computer and add any other computers to the Internet. If you want to connect the RG−1000 to the Internet, see the section Connecting the Wireless LAN to the Internet Using ORiNOCO RG−1000 later in this tutorial.
Testing Your Standalone Wireless LAN
Follow the next steps to test the standalone wireless LAN that you just built using the ORiNOCO RG−1000 Gateway and the ORiNOCO Silver PC Card.
- Connect to your wireless network from Windows XP computer by selecting View Available Wireless Networks from the menu as shown in Figure 6.

The Connect to Wireless Network dialog box appears. Select your wireless LAN AP from the list of available networks and click on Connect. You should now be connected to the wireless LAN.
- On your Windows XP computer, start a DOS window by clicking on Start menu and then clicking on the Run menu item. If you are using Windows XP Professional, type CMD; if you are using Windows XP Home Edition, type command.
- From the DOS window, type the following: C:>ping 10.0.1.1
If you get a response as shown below, you have correctly installed and configured your wireless LAN:
Pinging 10.0.1.1 with 32 bytes of data:
Reply from 10.0.1.1: bytes=32 time<10ms ttl="128" bytes="32" ttl="128" bytes="32" ttl="128" bytes="32" ttl="">
If there is an error or the computer is not configured correctly, you might get an error as follows:
C:\>ping 10.0.1.1
Pinging 10.0.1.1 with 32 bytes of data:
Request timed out.
Request timed out.
Request timed out.
Request timed out.
If you get the error message, check the operating system instructions and the instructions provided by the network card provider and by this tutorials to make sure that you have followed the instructions correctly.
In order to add more computing devices to your wireless LAN, add the wireless LAN adapters and configure them according to the instructions provided in the Setup Wireless LAN Adapters.
You will not have to make any changes to your RG−1000 unless you need to change the TCP/IP settings or you want to add more APs to the wireless LAN.
Connecting a Wireless LAN to the Internet
Today, one of the most popular uses of a wireless LAN is to share an Internet connection among its users. There are many different methods by which a wireless LAN can be connected to the Internet.
The following are some of the more common:
- Directly connecting the access point to a broadband connection. Some APs, for example ORiNOCO RG−1000, come with the capability to communicate with a DSL or cable modem to share an Internet connection among its users.
- Connecting the access point with a wired LAN that is already connected to the Internet. Most APs, for example ORiNOCO AP−1000, are able to connect the wireless LAN with a wired LAN.
If an Internet connection is already available to the wired LAN and the routers are configured such that traffic between the wireless LAN and the Internet, for example, a broadband DSL connection, is allowed, the network users in the wireless LAN can easily communicate with the Internet.
It is important to remember that connecting a wireless or wired LAN to the Internet opens up your LAN to users on the Internet and your network becomes vulnerable to attacks from hackers.
We strongly recommend that when planning to connect your computer to the Internet, you should make sure that you use, at least, a firewall and a router to control the traffic between the Internet and your LAN. You should also make sure that you take necessary steps to ensure the continued security of your LAN.
These steps normally include keeping in touch with the computer networking community and the networking industry to keep you aware of new developments in security standards and preventive measures against known and newly discovered security threats.
In this section, we discuss how wireless LANs that are built using the ORiNOCO RG−1000 Residential Gateway can be connected to the Internet.
Connecting Wireless LAN Based on ORiNOCO RG−1000 to the Internet.
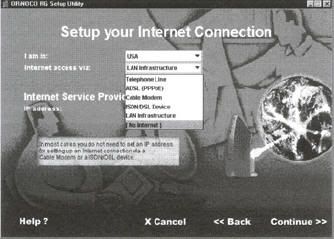
The ORiNOCO RG−1000 can be connected to the Internet by configuring the Setup your Internet Connection screen using the RG Setup Utility as shown in Figure 7.

RG−1000 provides four different ways to connect a wireless LAN to the Internet:
- Connecting a wireless LAN to a wired LAN that is already connected to the Internet. Select the [LAN infrastructure] option when choosing to connect with the Internet using this method.
You will need to make sure that you have all routers properly configured to allow network traffic to flow between the wireless LAN and the Internet through the wired LAN.
- Choose the [Telephone Line] option to connect the wireless LAN to the Internet using the built−in V−90 modem. You will need a dial−up Internet account and a phone line to be able to use this option. Contact your Internet Service Provider (ISP) for more information on how you can use this option.
- Use the [ISDN/DSL Device] or [ADSL] Option to connect with the Internet using a DSL, ISDN, or ADSL connection. You will need a respective technology's modem and an account with the service provider.
- Similarly, for using cable−based Internet connection, you will need a cable modem and a cable Internet account with your cable provider.